JohnSaves
Hello,
I’m still fairly inexperienced when it comes to film development and I regularly get frustrated when yet another roll of film, which actually had some great shots, ends up looking poor during development for some seemingly inexplicable reason...
Here’s a recent example; I’d be grateful for any advice or suggestions for improvement.
The situation:
An
Ilford HP5 Plus 400 black-and-white film was exposed normally (the camera’s light meter is accurate!) and developed as follows:
- Developer: Tetenal Ultrafin T-Plus, fresh batch of fresh developer, 1+4 solution
- Development method: Tilting development in a developing tank, tilted continuously for the first 30 seconds, then once every 30 seconds
- Development time: 9 minutes 15 seconds (according to Tetenal’s instructions)
- Development temperature: exactly 20°C
- Development process: 1. Developing, 2. Intermediate rinsing (Ilford method), 3. Fixing with Adofix (double clearing time, I think it was 6 minutes), 4. Final rinsing according to the Ilford method and finally a brief bath in distilled water with Adoflow.
The
result
is that the entire film looks significantly overexposed and flat. Here is an unprocessed scan straight from the raw file (Vuecan & Nikon Coolscan IV):
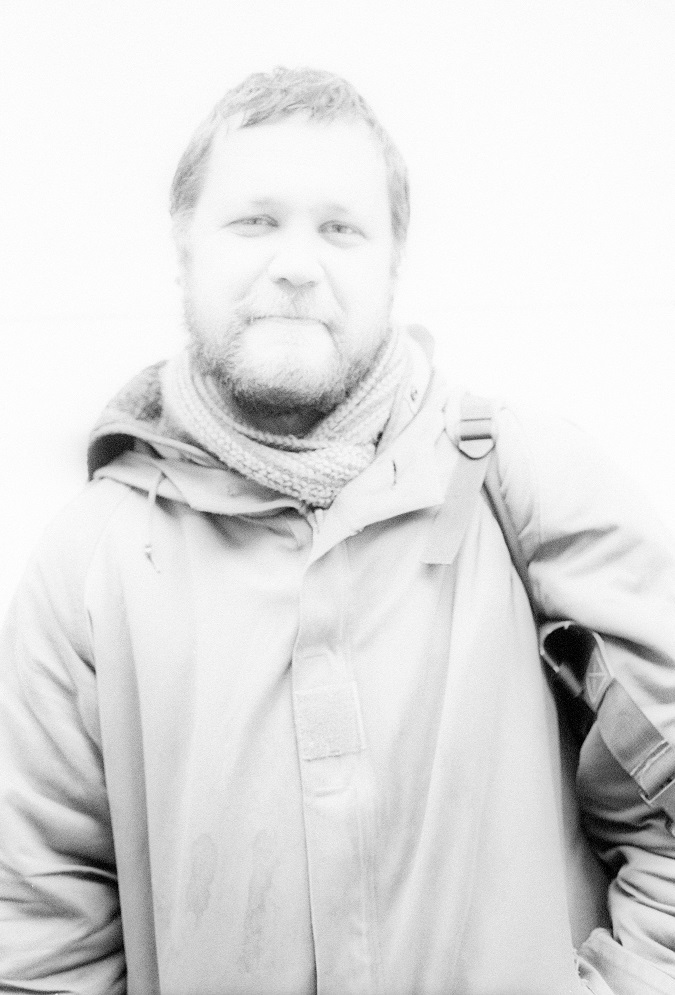
I’d be grateful for any advice on what I’m doing wrong – could you give me some pointers?
Urnes
How do you assess the negative? Just from the scan? If so, all you need to do is open the image in Photoshop and adjust the sliders in the Levels panel to match the histogram.
Do you find the negative itself too dense? Hmmm. I assume you’ve followed the instructions to the letter. Two things strike me: the agitation frequency seems a bit fast to me – once every 30 seconds is quick enough (though I don’t use Ultrafin either) – and I’d use a stop bath after the development rather than a rinse.
Regards, Sven.
AntiLynd
Yes, have a closer look at the negatives and/or post a photo of a negative (held up to the light).
I also suspect that you’ve experienced significant overexposure (i.e. not overdeveloped) of the film. If the film were overdeveloped, it would be the opposite of flat – in other words, too high in contrast. With significant overexposure (three or four stops), the entire image ends up too high on the curve, where the negative density is both too dense and flatter (lower contrast) across the curve. That’s exactly what it looks like in your case. A second clue: you have shadow detail that others would envy (the neck between the beard and the scarf).
Unlike Urnes, I would therefore say: you’re doing everything right when it comes to development. 1x every 30 seconds is absolutely standard for many people and not a plausible cause for negatives that regularly end up too high on the curve.
An acid stop bath is unnecessary. Many of the people who use one do so without ever having had a problem that would be solved by a stop bath. And based on what you describe, you definitely don’t have such a problem either (even overdevelopment wouldn’t be a factor).
So: check that your light meter isn’t just accurate, but that you’ve also set it and the camera correctly (namely to an ISO of 400, or better still slightly lower, down to about 200).
AntiLynd
PS: What sort of camera do you actually use? Can you rule out the possibility that your shutter speeds are inaccurate? That could well be the case: your shutter might be sticky, meaning that, for example, 1/30 sec is actually 1/4 sec.
ThomasPauly
Scanners can sometimes have problems like this with relatively dense negatives. However, the prints might turn out perfectly fine when produced as photochemical enlargements.
It could also be down to an incorrect setting or an operational error with the scanner or the software. Perhaps, during a batch scan, the settings were inadvertently carried over from a previous scan without being changed? Or was the spade between the negatives still included in the frame when the scan was taken?
As recommended above, a digital photograph of the strip of negatives on the light table would be helpful to determine whether the causes lie with the negatives at all.
Best regards,
Thomas
Urnes
Something else I noticed after the fact. It seems to me that the image is a bit too flat in the upper part. The contrast in the arm and coat is actually fine. But you’d have to check the original negative to be sure.
Regards, Sven.
DerReisefotograf
And are you sure the camera is working properly? I mean, that the aperture closes to the set value? And that the shutter is keeping to its specified speeds?
It would be best if you could show us a strip of negatives, either on a light box or held up to a window, so we can see what the negatives actually look like.
grommi
I think this is a hopelessly botched scan. Raw, unprocessed? That would at least partly explain the result. Unprocessed—i.e. 'undeveloped'—raw files look awful. In any case, there’s nothing more to be salvaged from the JPG.
DerReisefotograf
For now, I'm only interested in the negative; until we know what the negative looks like, there's no point in asking for the scan.
TR
Hi there. It looks like you’ve achieved correct exposure of the shadows. However, as mentioned earlier, you need to look at the negative as a whole.
To me, this looks more like a digitisation error: the so-called ‘gamma value’ is far too high (mid-tones are being ‘boosted’ disproportionately). If you’re using the “Silverfast” programme for digitisation, it’s very important here to select “Linear” as the curve and set the gamma to “1” (instead of 2.2) in the basic options. Only then (you now have a “raw scan”) should the positive process ideally be continued in Photoshop.
Edit: I’ve just noticed that you’re not scanning with Silverfast. However, with “Vuescann” it will be similar: switch off all image processing options completely and carry out the image processing later in a programme designed for this purpose.
JohnSaves
OK,
thanks so much for all the tips! Sorry for only getting round to replying now – I’ve been away on business all week.
A few more details to clarify:
?
- My camera exposes correctly; I usually get perfectly exposed images. So I assume the light meter and shutter are working.
- Regarding the scan: I always use exactly the same scan settings in Vuescan to get consistent results. I don’t think that’s the issue.
So I’ve been thinking about the development process...
- Regarding the negatives: I no longer have a digital camera, so I’ll try taking a suitable photo with my mobile... coming up!
JohnSaves
OK, here are a few more photos of the negatives. It’s not that easy to take good photos of them with an old mobile phone; I’ll try again later under better conditions and without the glassine...

€
Another example I’m not happy with:
€

€
and the negative:

AntiLynd
Right, so we can rule out poor development and now poor exposure as well. Your negatives are definitely printable. The problem lies with your scanner, the software and/or how you’re using it. Just look, for example, at how well the background is rendered on your negatives. That corresponds to perhaps ‘Zone’ VI to VII, at most. Why does that get completely lost in the scan? And where does the extreme micro-contrast in the sunglasses come from (in the scan, compared to the negative)?
€
To me, it all looks as though the scanner is setting the ‘exposure’ completely wrong – in other words, ‘too high’.
DerReisefotograf
The negatives look fine, so that can’t be the problem. You say you’re using Vuescan. I use that too. What are your settings like, for example in the ‘Filter’ tab? Which boxes have you ticked and which haven’t you? If ‘Restore colour/Correct fading’ is ticked, that alone can ruin a whole scan. With that box ticked, the negatives turn out quite dark, so I have to turn the brightness back up, and if you then untick it, the image becomes too bright. It’s possible that’s what happened to you.
I’ve just tried it out myself and managed to produce a similar result – an image that’s far too bright.
?
Furthermore, I think the image is far too bright. Where is your brightness slider in the ‘Colour’ tab? Try turning it down a little and see how your image changes – whether it improves. You can try the same with the light/dark gradation.
And for some reason, your default settings don’t suit these negatives.
And which film profile are you using in Vuescan? Because in Vuescan there’s only one Ilford profile, and that’s just for the XP2. But you could use the profile for the Tri-X; the films are quite similar, after all.
I’m a bit stumped – perhaps you accidentally bumped into a slider in Vuescan and adjusted it? It can easily happen without you noticing.
Do you edit your images after scanning, e.g. in LR or PS?
?
Personally, I’ve stopped scanning all my images with the same settings in Vuescan. I adjust each scan individually, both in Vuescan and in LR and PS.
It’s easier for me, as I never digitise whole rolls of film, but almost always just individual frames. I’ve got quite a bit of speed on this now. And I get some great-looking images as a result.
http://fc-foto.de/36558561
http://fc-foto.de/36357260
http://fc-foto.de/37751892
I’ve linked three images from the FC.
The last section is just my personal opinion and doesn’t claim to be universally applicable.
I hope this helps.
Best wishes, Tobias
Urnes
You can also display the histogram in VueScan and then drag the right-hand marker for the white point to match the curve. Otherwise, follow the steps described above. Open the image in an image-editing programme and, in the tone correction section, drag the black and white points to match the histogram. Done. The negatives look fine.
Regards, Sven.
DerReisefotograf
You can also display the histogram in VueScan and then drag the right-hand marker for the white point to the curve. ..........
Regards, Sven.
I’d forgotten that – it’s another option, but it’s too bright and washed-out.
grommi
"Then drag the right-hand marker for the white point onto the curve. ......."
?
If you set the white point lower, it just gets brighter ...... That only makes sense if the scanner hasn’t detected the white point correctly and the scan is too dark in the highlights. And VueScan often doesn’t get this quite right, so I like to set the white point to 0.02–0.1. But here, the highlights are already far too extreme.
?
I can’t get to grips with film profiles at all and can’t see the point of them either. A film profile for TriX? How long in which developer? And those are just two of many other variables. What’s the point of that apart from causing chaos? I always use the ‘generic’ profile and ‘Auto Extreme’ for white balance. That usually produces usable scans from the scanner in both black-and-white and colour without any fuss. A few clicks in image editing for some fine-tuning if needed, and that’s a job well done. Yes, it really can be that simple.
DerReisefotograf
€
I can’t get to grips with film profiles at all and can’t see the point of them either. A film profile for TriX? How long to develop it in which developer? And those are just two of many other variables. What’s the point of that apart from causing chaos? I always use the ‘generic’ profile and ‘Auto Extreme’ for white balance. That usually gives me usable scans from the scanner for both b&w and colour without any fuss. A few clicks in image editing for some fine-tuning if needed, and that’s a job well done. Yes, it really can be that simple.
I’ll give that a go; I’ve worked out a slightly different workflow for myself. Sounds good – I’m always open to new ideas.
TR
I make a point of not using the scanning software for image editing. Other programmes are much better suited to this – in my case, Photoshop. In other words, I scan in ‘raw’ mode using a linear curve, a gamma of 1 and without any filters. This gives me a 1:1 digitalisation of my negative – a ‘zero copy’ – which is then processed and edited in a ‘proper’ image-editing programme. I recommend this to anyone who doesn’t necessarily need a large number of usable images straight from the scanning software in a hurry (but instead, like in a darkroom, takes time over each individual image).
DerReisefotograf
I make a point of not using the scanning software for image editing. Other programmes are much better suited to this – in my case, Photoshop. In other words, I scan in ‘raw’ mode with a linear curve, a gamma of 1 and without any filters. This gives me a 1:1 digitalisation of my negative – a ‘zero copy’ – which is then processed and edited in a ‘proper’ image-editing programme. I recommend this to anyone who doesn’t necessarily need a large number of usable images straight from the scanning programme in a hurry (but instead takes their time with each individual image, just as in a darkroom).
That’s how I do it too, except that I already adjust the parameters in VueScan—such as brightness, white point, dark/light gradation, etc.—until I’m satisfied with the result. Only then does further processing in LR and CS take place, and only after that are my images finished. I process every negative that seems suitable to me individually, just as would happen in traditional darkroom work. Because, in my opinion, every negative is different, even if it comes from a series, and therefore requires its own individual processing.
